
BPP-440L Programmer's Reference
This page describes the font and instruction set. For hookup, configuration and specifications, please see the hardware reference.
Table of Contents
Serial Communication
BPP-440s accept asynchronous serial at 9600bps, 8 data bits, no parity, 1 or more stop bit(s), often called "N81." They will accept RS-232, inverted TTL, or non-inverted TTL (by cutting the Spol jumper). See the hardware reference for further information.
Character Set
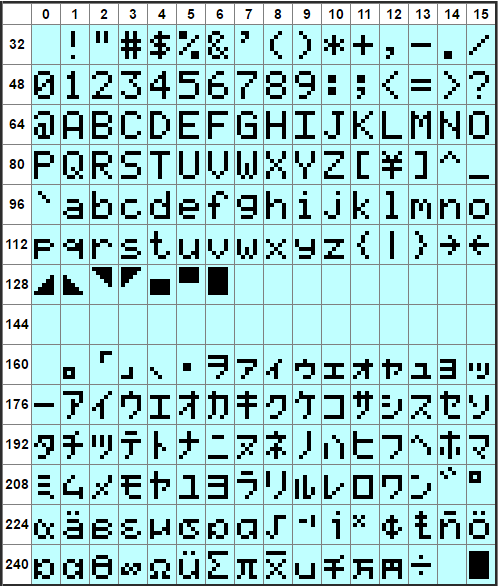
BPP-440s display the standard LCD character set for character codes 32 to 127 (0x20-0x7F hex). Character codes 128-135 (0x80-0x87 hex) are custom characters that may be redefined to make special symbols using the ESC Dn instruction.
Character Set (Character code= row+column)
Screen Layouts
BPP-440 displays four lines of 40 characters each. Printing works as you would expect, flowing left to right and top to bottom (though you can use control-P to print at any position on the screen).
For example, starting with the display cleared (its power-up state), suppose you send the following 160 bytes of text:
The BPP-440L serial LCD module displays alphanumeric text on a 4x40 backlit LCD. The serial interface offers 1200 - 9600bps operation and a handy BIG font mode.
..here is how the text is displayed:

Screen Layout. Position = row+column.
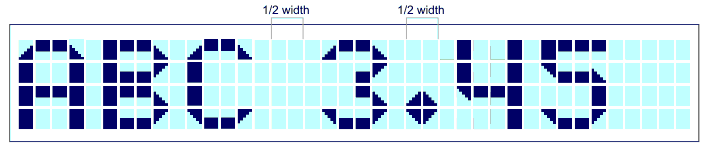
The display's "Big-character" mode can generate full-screen-height numbers and letters--up to eight letters/digits per screen. Big-mode symbols—consisting of dot/decimal point (.), hyphen/minus sign (-), colon (:) and space—take up one-half the width of other "big" characters.
Big Characters
Control Codes
BPP-440s understand a small set of control codes similar to our other text-mode displays (GLO, VFD, etc.). Codes not listed below (e.g., Null, 0) are ignored by the display.
Items marked with » can be clicked for tips or more detail.
Home (ctrl-A) 01 dec 0x01 hex
Moves the printing position to 0, the first character of the top line. »
Begin Big-Character Mode (ctrl-B) 02 dec 0x02 hex
Puts the display into Big-character mode, in which characters are displayed as 4-line tall graphics. The display can show up to eight big characters at a time. The big character set includes 0-9, A-Z (uppercase) and symbols dot/decimal point (.), hyphen/minus sign (-), colon (:) and space. The symbols take up one-half the width of the letter/number characters. To end big-character mode, send ctrl-C.
If you use this mode, avoid redefining custom characters 0-5 (ASCII 128-133 dec, 0x80-0x85 hex). These are the building blocks for the Big characters. You may use custom characters 6 and 7 (ASCII 134-135 dec, 0x86-0x87 hex) as these are not needed by Big mode. »
End Big-Character Mode (ctrl-C) 03 dec 0x03 hex
Cancels Big-mode printing. »
Hide Cursor (ctrl-D) 04 dec 0x04 hex
Turns off the visible cursor. »
Show Underline Cursor (ctrl-E) 05 dec 0x05 hex
Turns on an underline cursor that tracks the location of the next character to be printed. »
Show Blinking-Block Cursor (ctrl-F) 06 dec 0x06 hex
Turns on a blinking-block cursor that tracks the location of the next character to be printed. »
Bell (ctrl-G) 07 dec 0x07 hex
Pulses the Bell output briefly to beep a 25mA piezo buzzer (if connected). »
Backspace (ctrl-H) 08 dec 0x08 hex
Backs up one character, erases that character, sets the print position to erased character's location. »
Tab (ctrl-I) 09 dec 0x09 hex
Moves the printing position to the next multiple-of-4 screen location: 0→4→8→12→16→20→24→... »
Smart Linefeed (ctrl-J) 10 dec 0x0A hex
Moves the printing position down a line. »
Vertical Tab (ctrl-K) 11 dec 0x0B hex
Moves the printing position up a line. »
Clear Screen (ctrl-L) 12 dec 0x0C hex
Clears the screen and moves the printing position to 0—the first position of the first line. »
Carriage Return (ctrl-M) 13 dec 0x0D hex
Moves to the first printing position of the next line. »
Backlight On (ctrl-N) 14 dec 0x0E hex
Turns on the LED backlight. »
Backlight Off (ctrl-O) 15 dec 0x0F hex
Turns off the LED backlight. »
Set Printing Position (ctrl-P) 16 dec 0x10 hex
Sets the printing position according to the value of the next byte, position+64 (0x40 hex). For example, to move to the fourth character of the third line (position 83; see the chart above), you would send two bytes, 16 147 (0x10 0x93 hex)»
Clear Column (ctrl-Q) 17 dec 0x11 hex
Clears a vertical column of text based on the current cursor position.»
Right-align Text (ctrl-R) 18 dec 0x12 hex
Displays text (usually numeric) within a field 2 to 8 characters wide. The byte that follows ctrl-R is a text number from '2' to '8' (50-56 dec, 0x32-0x38 hex) that sets the field width. The text after that will be invisibly stored until one of the following is received:
- A control code.
- A period/decimal point.
- The specified number of bytes.
When this happens, the field will be cleared and the received text printed at the righthand end of the field. »
Escape: Start Multipart Instruction (ctrl-[) 27 dec 0x1B hex
See the Escape-code descriptions below.
Escape Instructions
These are multipart instructions that begin with the Escape character; 27 dec, 0x1B hex. Escape instructions affect memory: writing bitmaps to RAM to define custom characters, or storing/recalling text or character patterns to/from EEPROM.
Set Backlight Brightness ESC n
ESC n sets the brightness of the backlight in four steps from 25% to 100%. The value of n is specified by the printable numbers "0" to "3" (48-51 dec, 0x30-0x33 hex ). Sending ESC 2 (27 50 dec, 0x1B 0x32 hex) sets 75% brightness. Brightness changes do not take effect until the next time the backlight is turned on. If you want an immediate change, follow the instruction with a ctrl-N (backlight on). »
Define Custom Character Pattern ESC D n B0 B1 B2 B3 B4 B5 B6 B7
Change the pattern of custom character n to the bitmap made up of bytes B0 through B7. The value n is a text number '0' to '7' (48-55 dec, 0x30-0x37 hex) specifying the custom character to be defined. Custom characters are located at 128-135 (0x80-0x87) in the character set; i.e., custom character 0 is 128, 1 is 129...
The first six custom characters are used for Big-character mode. Do not redefine '0'-'5' if you're using Big characters.
The figure below shows how the bits of bytes B0 through B7 define the shape of the custom character. The upper three bits of the pattern bytes are ignored. A tool for calculating custom-character bytes is online at seetron.com.
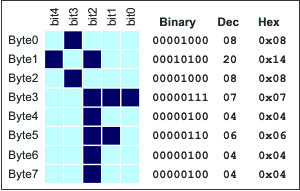
Bitmap Layout for Custom Characters.
An example: To define custom-character 6 (which maps to character code 134) to the °F pattern in the example above, you'd send the sequence of 11 bytes shown below.
| ESC | D | '6' | B0 | B1 | B2 | B3 | B4 | B5 | B6 | B7 | |
|---|---|---|---|---|---|---|---|---|---|---|---|
| Dec: | 27 | 68 | 54 | 8 | 20 | 8 | 7 | 4 | 6 | 4 | 4 |
| Hex: | 0x1B | 0x44 | 0x36 | 0x08 | 0x14 | 0x08 | 0x07 | 0x04 | 0x06 | 0x04 | 0x04 |
Recall Saved Data (text or custom characters) from Flash ESC E 0
Recall stored data from flash memory. ESC E (uppercase E; 69 dec, 0x45 hex) 0 (zero; 48 dec, 0x30 hex) recalls the saved startup text to the screen. For proper formatting, a ctrl-L (clear-screen) should immediately precede this instruction.
Restore Default Custom Characters ESC E 1
Writes default bitmaps to all eight custom characters: ESC E (uppercase E; 69 dec, 0x45 hex) 1 (49 dec, 0x31 hex). If you have redefined custom characters, you must send this instruction before using big-character mode.
Store Data (text and instructions) to Flash ESC X 0
Store data to flash memory. ESC X (uppercase X; 88 dec, 0x58 hex) 0 (zero; 48 dec, 0x30 hex) saves all text and instructions received since the last ctrl-L clear-screen. The BPP-440L will display this stored screen (and execute any embedded instructions) at startup.
This instruction can be disabled in order to protect the data from accidental changes by cutting the DSU (display setup) jumper on the interface pcb.
Additional Info on ESC X 0 (Store Data)
The basic purpose of ESC X 0 is to store a string of text that will be used at startup to display a splash screen, like the default model/version screen. But ESC X 0 can store instructions too, up to a total of 248 bytes. The only instruction it will not store is clear-screen, which it uses as a start marker. Why allow embedded instructions? It lets you set defaults (e.g., backlight brightness) that will be in effect as soon as the display powers up, or anytime an ESC E 0 is sent.
Below are some recipes for common types of startup screens.
| Blank Startup Screen | ctrl-L ESC X 0 | 12 27 88 48 dec 0x0C 0x1B 0x58 0x30 hex |
|---|---|---|
| Blank Startup Screen, Backlight On | ctrl-L ctrl-N ESC X 0 | 12 14 27 88 48 dec 0x0C 0x0E 0x1B 0x58 0x30 hex |
| Blank Startup Screen, Backlight Off, Default Brightness=High | ctrl-L ESC 3 ESC X 0 | 12 27 51 27 88 48 dec 0x0C 0x1B 0x33 0x1B 0x58 0x30 hex |
| Startup Screen="Hello!", Backlight On | ctrl-L ctrl-N "Hello!" ESC X 0 | 12 14 "Hello!" 27 88 48 dec 0x0C 0x0E "Hello!" 0x1B 0x58 0x30 hex |